BellaGrey Designs: DIY project
DIY project
While spring is in full swing, summer is just a month away! Pinwheels always remind me of the summer months! We came across these super cute pinwheel toppers and wanted to share them with you! 


To find out what you need to make this project and many others, click here for all the information!
Is there something that always reminds you of summer? We'd love to hear your thoughts!
If you make these, we'd love to see them!!

Have a great day!!

xoxo,
                                                         Photobucket

DIY :: Pinwheel Cupcake Toppers

While spring is in full swing, summer is just a month away! Pinwheels always remind me of the summer months! We came across these super cute pinwheel toppers and wanted to share them with you! 


To find out what you need to make this project and many others, click here for all the information!
Is there something that always reminds you of summer? We'd love to hear your thoughts!
If you make these, we'd love to see them!!

Have a great day!!

xoxo,
                                                         Photobucket
Do you have a daughter who LOVES headbands? You are NOT alone!! My daughter LOVES her headbands and every chance she gets, she asks me to buy more. I walked into her room the other day and this is what I saw


A mess of headbands!! So I thought, "I need to organize these better!" Today is the day I conquered it!

I made a headband organizer with these simple supplies from around the house:


One empty Oatmeal container
Double sided tape
Regular scotch tape
Heavy wrapping paper
Scissors


1) Measure the Oatmeal container


2) Cut your wrapping paper to fit the container 
{I used some paper with grids ~ this helps a lot to cut straight}


3) Tape one edge of the wrapping paper to the container


4) Wrap the paper around the container, making sure it goes all the way around and tape the other edge


5) I then started to tape the top edge down onto the lid of the container ~ I decided to go circular around the lid. I taped down all edges when I finished.


6) This is what it looks like all taped down {I didn't worry about the little space showing on the top, because I'm going to cover it}


7)  I created a small paper flower out of  tissue paper and added that to the top of the headband container


8) This is what the container looks like completed!! 


9) Here it is with all her headbands {OK just the large flowered ones}! 


Completed project ~ Now you can see her name on the cute box her God Mother gave her {with all of the plain headbands on the back wall of it}. 

Not bad for 10 - 15 minutes of my time!! Her dresser looks so much better and so do her headbands. If you decide to try this fun quick tutorial, please send photos ~ we'd love to see how yours turned out!!


Have a Super Great Day!!!

xoxo,
                                                        Photobucket

DIY Tutorial Headband Holder

Do you have a daughter who LOVES headbands? You are NOT alone!! My daughter LOVES her headbands and every chance she gets, she asks me to buy more. I walked into her room the other day and this is what I saw


A mess of headbands!! So I thought, "I need to organize these better!" Today is the day I conquered it!

I made a headband organizer with these simple supplies from around the house:


One empty Oatmeal container
Double sided tape
Regular scotch tape
Heavy wrapping paper
Scissors


1) Measure the Oatmeal container


2) Cut your wrapping paper to fit the container 
{I used some paper with grids ~ this helps a lot to cut straight}


3) Tape one edge of the wrapping paper to the container


4) Wrap the paper around the container, making sure it goes all the way around and tape the other edge


5) I then started to tape the top edge down onto the lid of the container ~ I decided to go circular around the lid. I taped down all edges when I finished.


6) This is what it looks like all taped down {I didn't worry about the little space showing on the top, because I'm going to cover it}


7)  I created a small paper flower out of  tissue paper and added that to the top of the headband container


8) This is what the container looks like completed!! 


9) Here it is with all her headbands {OK just the large flowered ones}! 


Completed project ~ Now you can see her name on the cute box her God Mother gave her {with all of the plain headbands on the back wall of it}. 

Not bad for 10 - 15 minutes of my time!! Her dresser looks so much better and so do her headbands. If you decide to try this fun quick tutorial, please send photos ~ we'd love to see how yours turned out!!


Have a Super Great Day!!!

xoxo,
                                                        Photobucket
Looking for some great Valentine edible goodies? Take a look at all these wonderful items ~ all from Etsy!! Plus, a DIY by us at the bottom of the post! 


Cake Pops perfect for a birthday, Valentines day  or any other special occasion
{Red, White and Pink Cake Pops via My Cake Pop Shop}


Large Homemade Vanilla "Valentine's Day" Cupcake Sugar Cookies (1 Dozen)
{Vanilla Sugar Cookies via Miss Betty Cakes}


Fondant Valentines Day Conversation Heart Cupcake Toppers Treats
{fondant cupcake toppers via Two Sweet Cakes}


Red Velvet Cupcake top sandwiches with creamed cheese frosting filling. Think Valentine's Day.
{Red Velvet Cupcake top sandwiches via 83 Sweets}


12 Valentine's Day Cupcake Push Pops
{Valentine's Day cupcake push pops via Half Baked Co}

Chocolate Hearts - 15 candies - Milk Chocolate, White Chocolate Valentines Treats and Edible Gits by Confectious on Etsy
{Chocolate hearts via Confectious}

Chocolate Covered Valentine Pretzel Rods With Heart Shaped Marshmallow Peep
{Chocolate Covered Valentine Pretzel rods via Eat Your Cake}

Heart Marshmallows, Pink Peppermint  - 3 piece
{Heart Marshmallows via Alaskan Dermish}

I posted my Valentine DIY last year, but I've gotten so many requests to post it again, so here it is:

{Finished project}


This is what you'll need:

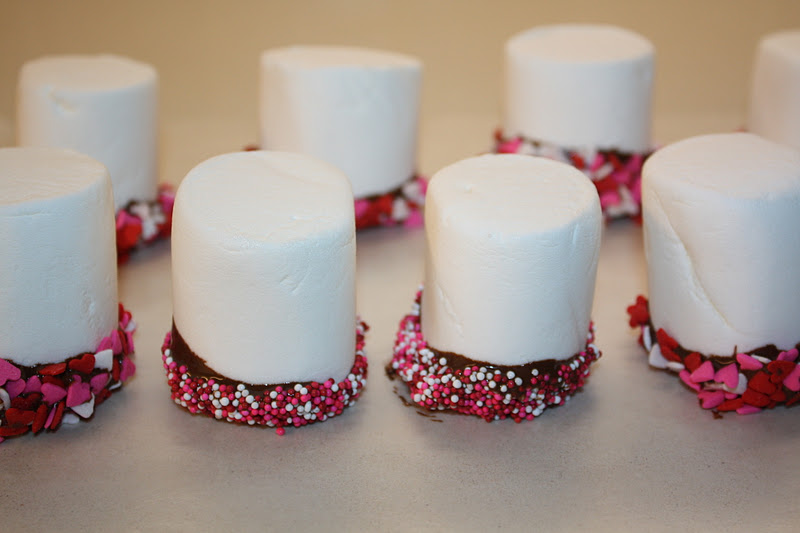
Giant Roasters Marshmallows
Chocolate chips
Valentine's Day sprinkles
Red Ribbon
Candy Bags
BellaGrey Designs FREE Red Heart Tag {get them here}


Get your supplies together & lay them out


Melt your chocolate chips in microwave


Dip marshmallows in chocolate then in the sprinkles you chose ~ that's all there is to it.

Are you making something special for your Valentine(s)? We'd love to see your DIY projects!

Hope you have a Super Great Day!!!

xoxo,
                                                         Photobucket

Some Valentine Love * including a DIY project *

Looking for some great Valentine edible goodies? Take a look at all these wonderful items ~ all from Etsy!! Plus, a DIY by us at the bottom of the post! 


Cake Pops perfect for a birthday, Valentines day  or any other special occasion
{Red, White and Pink Cake Pops via My Cake Pop Shop}


Large Homemade Vanilla "Valentine's Day" Cupcake Sugar Cookies (1 Dozen)
{Vanilla Sugar Cookies via Miss Betty Cakes}


Fondant Valentines Day Conversation Heart Cupcake Toppers Treats
{fondant cupcake toppers via Two Sweet Cakes}


Red Velvet Cupcake top sandwiches with creamed cheese frosting filling. Think Valentine's Day.
{Red Velvet Cupcake top sandwiches via 83 Sweets}


12 Valentine's Day Cupcake Push Pops
{Valentine's Day cupcake push pops via Half Baked Co}

Chocolate Hearts - 15 candies - Milk Chocolate, White Chocolate Valentines Treats and Edible Gits by Confectious on Etsy
{Chocolate hearts via Confectious}

Chocolate Covered Valentine Pretzel Rods With Heart Shaped Marshmallow Peep
{Chocolate Covered Valentine Pretzel rods via Eat Your Cake}

Heart Marshmallows, Pink Peppermint  - 3 piece
{Heart Marshmallows via Alaskan Dermish}

I posted my Valentine DIY last year, but I've gotten so many requests to post it again, so here it is:

{Finished project}


This is what you'll need:

Giant Roasters Marshmallows
Chocolate chips
Valentine's Day sprinkles
Red Ribbon
Candy Bags
BellaGrey Designs FREE Red Heart Tag {get them here}


Get your supplies together & lay them out


Melt your chocolate chips in microwave


Dip marshmallows in chocolate then in the sprinkles you chose ~ that's all there is to it.

Are you making something special for your Valentine(s)? We'd love to see your DIY projects!

Hope you have a Super Great Day!!!

xoxo,
                                                         Photobucket

Christmas Gift Wrap Ideas

I'm super excited to team up with a few of my blogger friends to bring you some great Christmas gift wrap ideas. Welcome to everyone vis...

Meet Jennifer

Meet Jennifer
God made and Jesus saved! This Colorado girl is living in a Texas world. I'm a home decor enthusiast, sharing our home, fashion and entertaining tips.

My Favorites

Recommendations

@Instagram