February 2012 | BellaGrey Designs
If you haven't seen our new collection by now {featured here} come take a look with us:


We present to you our newest collection ~ Vintage Peter Cottontail Easter Collection!! When trying to come up with a design for this glorious holiday, I thought about my childhood. How I loved the Peter Cottontail song. I remember singing it right up until Easter and then there after! I think my mom got tired of me singing it to tell you the truth!! :) I especially like the verse:
"You'll wake up on Easter morning
And you'll know that he was there
When you find those chocolate bunnies
That he's hiding everywhere" So this song inspired our new collection.


I wanted the bunnies to "come alive" a little bit, so I added "cottontails" to them. 


Our invitation nestled in a fluffy pink boa wreath, you can find the tutorial here.


Our Vintage Peter Cottontail Easter Collection is now for sale in our shop!
Let us help you celebrate this wonderful holiday. 

Even though this collection was designed for Easter, it could easily be for a 1st birthday, Baby Shower  or Bridal Shower.

Vendors: 
Party Designs/ Styling ~ BellaGrey Designs
Party Collection~ BellaGrey Designs Shop
Photography ~ BellaGrey Designs
Cupcakes ~ BellaGrey Designs


Would you like to learn how to make one of these boa wreaths? 


Then stay tuned for a DIY super easy, super quick tutorial coming soon!!

Hope you have a Super Great Day!!!
                                                       

NEW * Vintage Peter Cottontail Easter Collection

If you haven't seen our new collection by now {featured here} come take a look with us:


We present to you our newest collection ~ Vintage Peter Cottontail Easter Collection!! When trying to come up with a design for this glorious holiday, I thought about my childhood. How I loved the Peter Cottontail song. I remember singing it right up until Easter and then there after! I think my mom got tired of me singing it to tell you the truth!! :) I especially like the verse:
"You'll wake up on Easter morning
And you'll know that he was there
When you find those chocolate bunnies
That he's hiding everywhere" So this song inspired our new collection.


I wanted the bunnies to "come alive" a little bit, so I added "cottontails" to them. 


Our invitation nestled in a fluffy pink boa wreath, you can find the tutorial here.


Our Vintage Peter Cottontail Easter Collection is now for sale in our shop!
Let us help you celebrate this wonderful holiday. 

Even though this collection was designed for Easter, it could easily be for a 1st birthday, Baby Shower  or Bridal Shower.

Vendors: 
Party Designs/ Styling ~ BellaGrey Designs
Party Collection~ BellaGrey Designs Shop
Photography ~ BellaGrey Designs
Cupcakes ~ BellaGrey Designs


Would you like to learn how to make one of these boa wreaths? 


Then stay tuned for a DIY super easy, super quick tutorial coming soon!!

Hope you have a Super Great Day!!!
                                                       
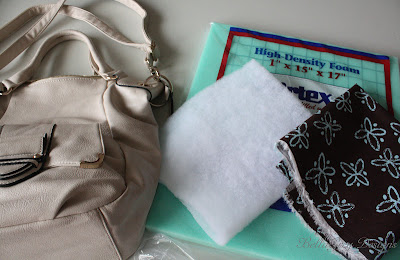
I don't know about you, but I have searched a long time for a camera bag that I like. I found some that look like a purse, but the price tag was a little steep for me. So I decided to make my own!! I purchased my supplies from a local craft store and I had the purse. I knew I wanted a wide purse with several pockets, so I'd be able to fit a lens or two along with my cell phone, wallet and other essentials. 

Here's what I did:


Supplies:
Purse of your choice
1" thick Foam
1 yd Batting
1 yd material


1) Measure the bottom of your purse ~ you'll need this to make the extra padding 


2) Measure the inside of the purse ~ from the bottom up the sides ~ you'll need this to make the long padding


3) I covered the inserts with the fabric and enclosed them like pillowcases ~ the long one will line the sides and bottom of the purse. The smaller one will act like extra protection for the bottom of the purse


I have a divider in my purse, so I just lined one side and left the other side for all of my essentials. As you can see in this photo the camera is well protected and has twice as much padding on the bottom. 


I even made a camera strap cover, since I had so much material left over! For this measure your strap from end to end. I then placed the material over the strap and allowed for about 1/4" to sew the sides together. Make sure you sew it inside out.  I then turned the material right side out & slid it over my strap!! POOF ~ it was done. This project didn't take me long at all, but I can't really give you a time, since my kiddos were home with me at the time and I worked on it, then left it, and worked on it again. If I'd have to guess, it probably took me about an hour or so.  All for under $45.00. I'm so excited about this project, for a few reasons ~ I now have a totally functional and stylish camera bag and I can take it with me when I go to NYC next week!! I'll let you know how well it worked! 

Do you have a camera bag you just love? Or are you like me ~ saw one you love, but can't swallow the price? Try this easy tutorial out & let us know how it worked for you. This project is really pretty simple, believe me, I have a sewing machine, but I'm a total novice. I don't like patterns, I see something in my head and just try to make it. Most of the time it comes out a lot better than I expected and other times ~ well we won't talk about those! All I can say is YIKES!!!! 

Have a Super Great Day all you FABULOUS people!!!

xoxo,
                                                         Photobucket

DIY Tutorial Camera Bag

I don't know about you, but I have searched a long time for a camera bag that I like. I found some that look like a purse, but the price tag was a little steep for me. So I decided to make my own!! I purchased my supplies from a local craft store and I had the purse. I knew I wanted a wide purse with several pockets, so I'd be able to fit a lens or two along with my cell phone, wallet and other essentials. 

Here's what I did:


Supplies:
Purse of your choice
1" thick Foam
1 yd Batting
1 yd material


1) Measure the bottom of your purse ~ you'll need this to make the extra padding 


2) Measure the inside of the purse ~ from the bottom up the sides ~ you'll need this to make the long padding


3) I covered the inserts with the fabric and enclosed them like pillowcases ~ the long one will line the sides and bottom of the purse. The smaller one will act like extra protection for the bottom of the purse


I have a divider in my purse, so I just lined one side and left the other side for all of my essentials. As you can see in this photo the camera is well protected and has twice as much padding on the bottom. 


I even made a camera strap cover, since I had so much material left over! For this measure your strap from end to end. I then placed the material over the strap and allowed for about 1/4" to sew the sides together. Make sure you sew it inside out.  I then turned the material right side out & slid it over my strap!! POOF ~ it was done. This project didn't take me long at all, but I can't really give you a time, since my kiddos were home with me at the time and I worked on it, then left it, and worked on it again. If I'd have to guess, it probably took me about an hour or so.  All for under $45.00. I'm so excited about this project, for a few reasons ~ I now have a totally functional and stylish camera bag and I can take it with me when I go to NYC next week!! I'll let you know how well it worked! 

Do you have a camera bag you just love? Or are you like me ~ saw one you love, but can't swallow the price? Try this easy tutorial out & let us know how it worked for you. This project is really pretty simple, believe me, I have a sewing machine, but I'm a total novice. I don't like patterns, I see something in my head and just try to make it. Most of the time it comes out a lot better than I expected and other times ~ well we won't talk about those! All I can say is YIKES!!!! 

Have a Super Great Day all you FABULOUS people!!!

xoxo,
                                                         Photobucket

What are you doing today? We just finished assembling these little black boxes for an upcoming event! What will go into this little black boxes you ask? Well, that information is top secret right now, but I promise to reveal the secret as soon as I can ~ so stay tuned!! Like the infamous little black dress, these little black boxes are mysterious!!
If you had to stuff these boxes what would you put in there? I'd love to hear your creative ideas ~ please do share! 


Hope you have a Super Thrilling Thursday!!!

xoxo,
                                                          Photobucket

Little Black Box


What are you doing today? We just finished assembling these little black boxes for an upcoming event! What will go into this little black boxes you ask? Well, that information is top secret right now, but I promise to reveal the secret as soon as I can ~ so stay tuned!! Like the infamous little black dress, these little black boxes are mysterious!!
If you had to stuff these boxes what would you put in there? I'd love to hear your creative ideas ~ please do share! 


Hope you have a Super Thrilling Thursday!!!

xoxo,
                                                          Photobucket


Last year we created this fun "You've Been Leprechaun'd" sign see post here! If you've never played this game, just follow the directions on this sign. Use this sign to Leprechaun your friends and neighbors and then 

leave this sign with your friend and neighbors to show they've been Leprechaun'd. Don't forget to display this sign at your house too, so you won't get Leprechaun'd again!! 
You can download these signs here

And don't forget to purchase your St. Patty's Day party decor here!

Have a Wonderful Day!!

xoxo,
                                                          Photobucket

You've Been Leprechaun'd


Last year we created this fun "You've Been Leprechaun'd" sign see post here! If you've never played this game, just follow the directions on this sign. Use this sign to Leprechaun your friends and neighbors and then 

leave this sign with your friend and neighbors to show they've been Leprechaun'd. Don't forget to display this sign at your house too, so you won't get Leprechaun'd again!! 
You can download these signs here

And don't forget to purchase your St. Patty's Day party decor here!

Have a Wonderful Day!!

xoxo,
                                                          Photobucket

What are you doing today? I just finished making a batch of light pink Meringue cookies. They're for a  photo shoot later today. I like to make these wonderfully light, airy cookies whenever I can.
Here's the recipe I use:

Ingredients:
4 Egg Whites
1/4 teaspoon Salt
1/4 teaspoon Cream of Tarter 
1 1/3 cup Sugar

Preheat oven to 225 degrees. Line baking sheet with foil. 

In large bowl, mix Egg Whites until foamy and form soft peaks. Add Salt and Cream of Tarter. Add sugar a little at a time and mix ingredients for approximately 6 - 10 minutes. The meringue will be shiny and have stiff peaks. If you decide to add food coloring, you may need to continue mixing for a bit longer to bring peaks back. 
You can drop these by spoonful or fill a decorating bag with the meringue, using  a 3/4" star tip, pipe about 20 small swirls. 
Bake for 1 1/2 hours, turn off the oven and leave oven door ajar for at least an hour after baking. 

I you decide to make these, please come back and tell me how they turned out. 

Have a Super Great Day!!!

xoxo,
                                                          Photobucket
  • Monday, February 20, 2012

Meringue Cookies & Recipe


What are you doing today? I just finished making a batch of light pink Meringue cookies. They're for a  photo shoot later today. I like to make these wonderfully light, airy cookies whenever I can.
Here's the recipe I use:

Ingredients:
4 Egg Whites
1/4 teaspoon Salt
1/4 teaspoon Cream of Tarter 
1 1/3 cup Sugar

Preheat oven to 225 degrees. Line baking sheet with foil. 

In large bowl, mix Egg Whites until foamy and form soft peaks. Add Salt and Cream of Tarter. Add sugar a little at a time and mix ingredients for approximately 6 - 10 minutes. The meringue will be shiny and have stiff peaks. If you decide to add food coloring, you may need to continue mixing for a bit longer to bring peaks back. 
You can drop these by spoonful or fill a decorating bag with the meringue, using  a 3/4" star tip, pipe about 20 small swirls. 
Bake for 1 1/2 hours, turn off the oven and leave oven door ajar for at least an hour after baking. 

I you decide to make these, please come back and tell me how they turned out. 

Have a Super Great Day!!!

xoxo,
                                                          Photobucket

{Cupcake Toppers ~  3 designs}

You know what I love about St. Patrick's Day? I love the happiness and the traditions of it all!! I'm not Irish, but my husband is part Irish and part Italian ~ so we celebrate with the best of them. I created this collection last year and am in the process of creating something new for this year, but wanted to get your input. What would you like to see for this year's St. Patrick's Day collection? 

{Straw Flags ~ two designs}

When I was a kid, we would pinch each other if we didn't have green on, on St. Patrick's Day. What memories do you have from your childhood of St. Patrick's Day? Mom made us green jello and green milk. Now I have carried those traditions on to my kids, but also add all types of green food for breakfast, lunch and dinner. Do you make green food for your family? I love to hear what you make. 

Our Luck of The Irish Collection is available now in our shop!

This collection includes:
Cupcake Toppers {3 designs}
Straw Flags {2 designs}
3x3 Blank Note Cards


As always, this collection can be customized for an additional fee. 


Hope you have a Super Great Day!!!

xoxo,
                                                        Photobucket

Luck of The Irish Collection


{Cupcake Toppers ~  3 designs}

You know what I love about St. Patrick's Day? I love the happiness and the traditions of it all!! I'm not Irish, but my husband is part Irish and part Italian ~ so we celebrate with the best of them. I created this collection last year and am in the process of creating something new for this year, but wanted to get your input. What would you like to see for this year's St. Patrick's Day collection? 

{Straw Flags ~ two designs}

When I was a kid, we would pinch each other if we didn't have green on, on St. Patrick's Day. What memories do you have from your childhood of St. Patrick's Day? Mom made us green jello and green milk. Now I have carried those traditions on to my kids, but also add all types of green food for breakfast, lunch and dinner. Do you make green food for your family? I love to hear what you make. 

Our Luck of The Irish Collection is available now in our shop!

This collection includes:
Cupcake Toppers {3 designs}
Straw Flags {2 designs}
3x3 Blank Note Cards


As always, this collection can be customized for an additional fee. 


Hope you have a Super Great Day!!!

xoxo,
                                                        Photobucket

Happy Valentine's Day!! We hope you have a super sweet day!!


Who's your special someone? Mine are my husband and my kids!! They are always my Valentines ~ 365 days a year & this year I get to love them one extra day!!!
 366 Days!!


Sending some love your way!!


Have a Super Great Day!!!

xoxo,
                                                         Photobucket
  • Tuesday, February 14, 2012

Happy Valentine's Day


Happy Valentine's Day!! We hope you have a super sweet day!!


Who's your special someone? Mine are my husband and my kids!! They are always my Valentines ~ 365 days a year & this year I get to love them one extra day!!!
 366 Days!!


Sending some love your way!!


Have a Super Great Day!!!

xoxo,
                                                         Photobucket
Looking for some last minute ideas to dress up your table for Valentine's Day? 
Look no further ~ 
today we are featuring

The Wedding Bistro at Bellenza


Party details as described by Bellenza:

This wedding table setting we’ve styled still incorporates the classic “roses and candles” look of Valentine’s—along with pearls, lace, and of course the color red. But we toned down the sweetness, and upped the sophistication factor.

We precisely kept the requisite red and white of the season, but incorporated stylish, sophisticated black. The immediate message? This is one Valentine’s dinner party with pizazz!

You also see the interplay of feminine, floral elements and edgy, sleek touches on our table. Deep red flowers, glowing candles, and strands of pearls are set against the modern black runner, as well as glass, metal, and mirrored pieces.

Much of the appeal of this setting, for all its modernity, is the easy, seemingly unplanned placement of decorative elements. Flowers just appear to have been tossed in at random. Pearl strands drape casually around, over, and into glass containers. Candles peer out from among the decorations in various places.


********** 
I don't know about you, but I'm super excited to start decorating a Valentine's Day table with pizzaz!! We'd love to hear your comments on these beautiful tablescapes and if you re-create these, we'd love to see photos!! 


Want to see more wonderful styling, check out their website and Facebook page ~ please tell them we sent you!!

To view the original post, click here

We hope you've enjoyed Bellenza as much as we have! 

xoxo,
Photobucket

Feature * The Wedding Bistro at Bellenza

Looking for some last minute ideas to dress up your table for Valentine's Day? 
Look no further ~ 
today we are featuring

The Wedding Bistro at Bellenza


Party details as described by Bellenza:

This wedding table setting we’ve styled still incorporates the classic “roses and candles” look of Valentine’s—along with pearls, lace, and of course the color red. But we toned down the sweetness, and upped the sophistication factor.

We precisely kept the requisite red and white of the season, but incorporated stylish, sophisticated black. The immediate message? This is one Valentine’s dinner party with pizazz!

You also see the interplay of feminine, floral elements and edgy, sleek touches on our table. Deep red flowers, glowing candles, and strands of pearls are set against the modern black runner, as well as glass, metal, and mirrored pieces.

Much of the appeal of this setting, for all its modernity, is the easy, seemingly unplanned placement of decorative elements. Flowers just appear to have been tossed in at random. Pearl strands drape casually around, over, and into glass containers. Candles peer out from among the decorations in various places.


********** 
I don't know about you, but I'm super excited to start decorating a Valentine's Day table with pizzaz!! We'd love to hear your comments on these beautiful tablescapes and if you re-create these, we'd love to see photos!! 


Want to see more wonderful styling, check out their website and Facebook page ~ please tell them we sent you!!

To view the original post, click here

We hope you've enjoyed Bellenza as much as we have! 

xoxo,
Photobucket

Are you looking for some tags, stickers or favor bag toppers for your Valentine's Day treats then take a look at our recap of all the Free downloads we offered for Valentine's Day:

{Red Heart Tags}and a tutorial on how to make chocolate dipped marshmallows


{Valentine Candy Kiss stickers}and what you'll need to create these 


{Star Burst Valentine Treat Toppers}just cut and fold these over a snack bag or
 a traditional favor sized bag ~ fill with lots of Valentine goodies 
and hand out to friends and family!!

I hope you enjoyed all of our free downloads for Valentine's Day ~ we'd love to see photos of how you used them. 

You can download all three of these by clicking the link below each photo. 

Have a Super Great Day!!! 

xoxo,
                                                          Photobucket

Valentine's Day * Free * downloads

Are you looking for some tags, stickers or favor bag toppers for your Valentine's Day treats then take a look at our recap of all the Free downloads we offered for Valentine's Day:

{Red Heart Tags}and a tutorial on how to make chocolate dipped marshmallows


{Valentine Candy Kiss stickers}and what you'll need to create these 


{Star Burst Valentine Treat Toppers}just cut and fold these over a snack bag or
 a traditional favor sized bag ~ fill with lots of Valentine goodies 
and hand out to friends and family!!

I hope you enjoyed all of our free downloads for Valentine's Day ~ we'd love to see photos of how you used them. 

You can download all three of these by clicking the link below each photo. 

Have a Super Great Day!!! 

xoxo,
                                                          Photobucket
I've been thinking about doing this for awhile now ~ Paying It Forward!! Have you ever done it for someone else or had it done for you? 
I've had friends and other Mompreneurs pay it forward for me and I'd like to return the favor. 


Networking with each other for each other, is how we help each other. So if you're a Mompreneur or a woman entrepreneur, contact me, and we'll "Pay It Forward". I love helping people out {especially Mompreneurs and women entrepreneurs}and if we can help you out we'd be thrilled.  
One of my friends said  "It’s important for you to OWN your business and TELL people about it."  {Tara of Taradara Made It}  In fact, she is one of my friends to "Pay It Forward" for me ~ I met Tara at SITS Bloggy Boot Camp ~ Denver last September {See post here} and awhile back she spotlighted BellaGrey Designs Etsy Shop. I can not thank her and all the others who "Pay It Forward" for BellaGrey Designs. So, let's "Pay It Forward" girls!! Leave your comments below or email me directly!

Hope you have a Super Great Day!!!

xoxo,
Photobucket

Paying It Forward

I've been thinking about doing this for awhile now ~ Paying It Forward!! Have you ever done it for someone else or had it done for you? 
I've had friends and other Mompreneurs pay it forward for me and I'd like to return the favor. 


Networking with each other for each other, is how we help each other. So if you're a Mompreneur or a woman entrepreneur, contact me, and we'll "Pay It Forward". I love helping people out {especially Mompreneurs and women entrepreneurs}and if we can help you out we'd be thrilled.  
One of my friends said  "It’s important for you to OWN your business and TELL people about it."  {Tara of Taradara Made It}  In fact, she is one of my friends to "Pay It Forward" for me ~ I met Tara at SITS Bloggy Boot Camp ~ Denver last September {See post here} and awhile back she spotlighted BellaGrey Designs Etsy Shop. I can not thank her and all the others who "Pay It Forward" for BellaGrey Designs. So, let's "Pay It Forward" girls!! Leave your comments below or email me directly!

Hope you have a Super Great Day!!!

xoxo,
Photobucket

Christmas Gift Wrap Ideas

I'm super excited to team up with a few of my blogger friends to bring you some great Christmas gift wrap ideas. Welcome to everyone vis...

Meet Jennifer

Meet Jennifer
God made and Jesus saved! This Colorado girl is living in a Texas world. I'm a home decor enthusiast, sharing our home, fashion and entertaining tips.

My Favorites

Recommendations

@Instagram